How to Get Extra Zoom with Your Sony Mirrorless Camera (Even with Just One Lens!)
If you use a Sony mirrorless camera and you always feel “I wish I had just a bit more zoom,” you’re not alone. The good news: Sony bodies give you several ways to squeeze extra reach out of the gear you already own, without always buying a huge wildlife lens.
Let’s walk through the main options in a simple, step-by-step way:
- Start with a good all-in-one zoom lens
- Use APS-C crop mode for “free zoom”
- Use up to 2x Clear Image Zoom (but know the RAW limitation)
- Understand normal digital zoom and when it’s a bad idea
- Other smart tricks: cropping, teleconverters, and just moving your feet
I’ll keep it very human, very simple, and for every step I’ll tell you:
- How to do it
- What’s good
- What’s bad
- Best practice / how to get the most from it
1. Start with a zoom lens
Before we touch any camera menu, you need a lens that can actually zoom. Two great “do-everything” budget-friendly options for Sony full-frame are:
- Tamron 25–200mm f/2.8–5.6 (new G2 lens) – full-frame E-mount superzoom, goes a bit wider at 25mm and all the way to 200mm, with f/2.8 at the wide end.
- Tamron 28–200mm f/2.8–5.6 (older lens) – also a full-frame E-mount superzoom, 28mm to 200mm, same basic brightness range.
Both are travel-style “one lens for almost everything.” You can shoot wide landscapes, family photos, and also zoom in for portraits or distant subjects.
1.1 How to set yourself up
- Mount the 25–200mm or 28–200mm on your Sony full-frame body (like an A7 series).
- Set the camera to Aperture Priority (A) or Shutter Priority (S) so you can control depth of field or motion.
- Zoom all the way to 200mm when you need reach.
1.2 What’s good
- Huge range in one lens. 25/28mm to 200mm covers almost everything from wide to telephoto.
- f/2.8 at the wide end. Nice for low light and blurred background at the wide side.
- Light and travel-friendly compared to big pro telephoto lenses.
1.3 What’s bad
- At the long end (200mm), these lenses are not as sharp as dedicated 70–200mm pro lenses, especially in the corners.
- Maximum aperture at 200mm is f/5.6, so you need more light or higher ISO.
- No built-in optical stabilizer on these specific lenses; they rely on the camera’s IBIS (in-body stabilisation). If you are using a Camera, e.g. Sony Alpha A7 III or A7 IV, you are good since they come with 5-axis in-body image stabilization that compensate greatly.
1.4 Best practice / how to get the most
- At 200mm, keep shutter speed fast (ideally 1/400s or faster) to reduce blur from hand-shake.
- Stop down a little (for example f/8) if you want extra sharpness at the long end.
- Use continuous AF (AF-C) and eye / subject tracking for moving subjects.
- If you can afford only one lens, the 25–200mm G2 is a slightly more modern and wider option, while the 28–200mm is still a strong value choice.
Once you have 200mm, now we stack the camera tricks to go even further.
2. Use APS-C crop mode (the “free zoom” inside your camera)
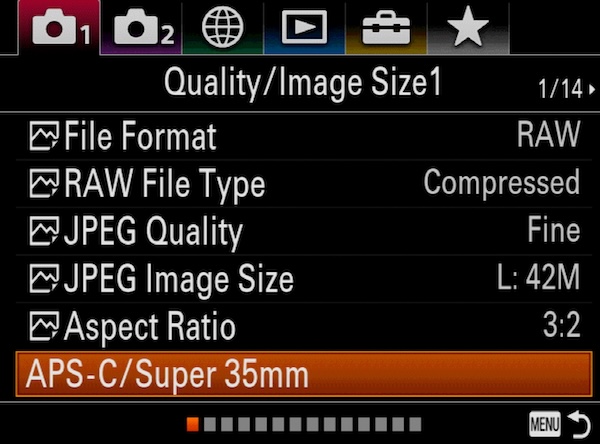
If you are on a full-frame Sony body, you can turn on APS-C / Super 35mm crop mode. This uses only the middle part of the sensor (like an a6xxx camera). That gives you 1.5x extra reach without changing the lens.
So:
- 200mm in full-frame mode
- becomes about 300mm equivalent in APS-C mode (200 × 1.5 = 300)
2.1 How to do it (names can vary slightly by model)
- Press MENU.
- Go to the Image Size / Image Area section.
- Find “APS-C/Super 35mm” or “Image Area”.
- Choose APS-C (instead of full frame).
You’ll see your field of view suddenly “zoom in” even though the lens did not move.
2.2 What’s good
- It feels like free zoom. No new lens, just a camera setting.
- Image quality stays high because the camera is not upscaling; it just uses a smaller center part of the sensor.
- Autofocus still works normally.
2.3 What’s bad
- You lose resolution. A 33 MP sensor drops to roughly 14–16 MP (exact number depends on camera).
- The image looks more zoomed in, but noise can show more if you push ISO, because you’re working with fewer pixels.
2.4 Best practice / how to get the most
- Use APS-C mode when you really need more reach (wildlife, sports, kids far away on a stage).
- For important photos where you want maximum detail, you can shoot in full-frame and crop later on a computer instead.
- Combine APS-C mode with a zoomed lens at 200mm to get a very tight frame without changing gear.
3. Use up to 2x Clear Image Zoom (but remember: no RAW stills)
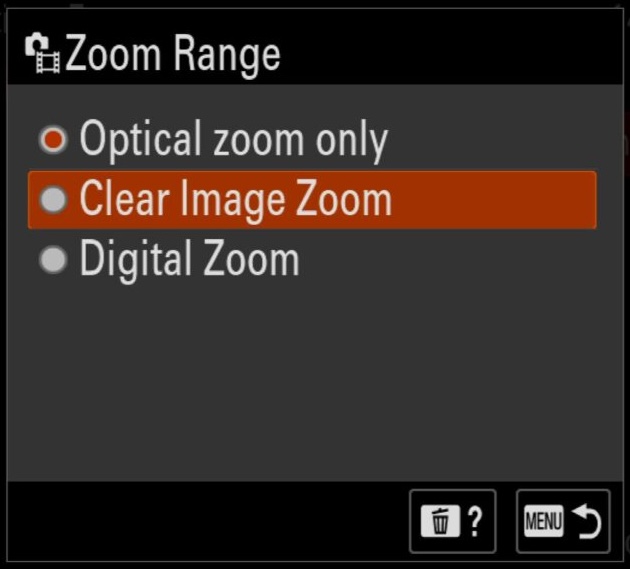
Sony’s Clear Image Zoom (CIZ) is a “smart” zoom. The camera first uses the normal optical zoom, then uses extra image data and processing to zoom up to 2x more while trying to keep quality close to normal.
So if you’re at 200mm:
- 200mm × 2x Clear Image Zoom = 400mm equivalent
- If you also use APS-C crop: 200mm × 1.5 × 2 = about 600mm field of view
Very powerful for a small lens.
But here’s the big catch: for still photos, Clear Image Zoom only works with JPEG/HEIF, not RAW. You cannot use CIZ on RAW stills.
3.1 How to turn on Clear Image Zoom
Exact menus differ by body, but the idea is like this:
- Set Image Quality to JPEG since it won’t let you turn on in case you are using RAW.
- In the MENU, find Zoom Setting and set it to Clear Image Zoom.
- Assign “Zoom” or “Clear Image Zoom” to a custom button or the control wheel (so you can use it quickly).
- Zoom the lens to 200mm, then use the button or zoom lever to push CIZ up to 2.0x.
Check your live view – you’ll see the frame slowly “creep in” more, even though the physical lens is already at max.
3.2 What’s good
- You get up to 2x extra reach with surprisingly good quality, much better than normal digital zoom.
- Works very well for video and for JPEG stills.
- It feels like you suddenly own a bigger telephoto lens.
3.3 What’s bad
- For still photos, you cannot keep true RAW if you want the CIZ effect. You must be in JPEG.
- If you push it to 2.0x in bad light or with a soft lens, you may see a bit of softness or noise.
- If you already used APS-C mode + high ISO, the small sensor area plus CIZ can make noise more obvious.
3.4 Best practice / how to get the most
- Use Clear Image Zoom in good light. Low ISO gives cleaner results.
- Try not to always jump to full 2.0x. Often 1.2x–1.5x is enough and looks cleaner.
- If you absolutely need RAW for big editing, you can:
- Take one shot with CIZ (JPEG) for framing and reach.
- Then take another shot without CIZ in RAW and crop later if possible.
- For video, CIZ is amazing. It lets you re-frame without changing lenses and still looks very good, especially in 4K.
4. Normal Digital Zoom (the one you should mostly avoid)
Sony bodies also have a Digital Zoom option (not Clear Image Zoom). This is basically just the camera cropping and enlarging the image like phone pinch-zoom. It doesn’t use the same smart processing as CIZ.
4.1 How to turn it on (not recommended except emergencies)
- Change the image setting to use JPEG only since this option can only be enabled in JPEG mode.
- In the Zoom Setting, choose Digital Zoom.
- Use the zoom control to go beyond the normal range.
You’ll see the zoom indicator go past the Clear Image Zoom area.
4.2 What’s good
- In a real emergency, when you cannot crop later and the subject is super tiny, it gives you a little extra reach.
- It’s easy. No extra gear.
4.3 What’s bad
- Image quality drops fast. The camera is just upscaling pixels.
- Photos look soft, noisy, and “digital”, especially if you zoom a lot.
- You can’t “fix” that later in editing. The detail was never there.
4.4 Best practice / how to get the most
- Avoid normal digital zoom for important photos.
- If you really need it, keep the digital zoom very small (for example 1.2x).
- It’s usually better to:
- Shoot at normal zoom,
- Keep the quality high,
- Then crop a bit on your computer or phone afterwards.
Think of normal digital zoom as the “last-chance emergency button,” not a daily tool.
5. Other smart ways to get “extra zoom”
There are a few more tricks that help you get closer without ruining image quality.
5.1 Crop high-resolution photos in editing
If you shoot on a high-megapixel Sony body, you can crop a lot later and still keep a good-size image.
How to do it
- Shoot in full-frame RAW + JPEG with your zoom lens at 200mm.
- Import into Lightroom, Capture One, Photos app, or any editor.
- Crop tighter around your subject.
What’s good
- You keep full control of how much you crop.
- You keep maximum image quality from the sensor.
- You can change your mind later and crop differently.
What’s bad
- You need time on a computer or tablet.
- Very heavy crops can show noise and softness, especially if the original shot was not super sharp.
Best practice
- Try to fill the frame as much as possible in camera first.
- Use cropping as a fine-tuning tool, not the main way to get closer every time.
5.2 Use a teleconverter (on compatible lenses)
Teleconverters are small optical adapters (like 1.4x or 2x) that sit between the camera and lens and give more reach. They only work with certain Sony telephoto lenses, not usually with lenses like Tamron 25–200mm or 28–200mm.
But I’ll still explain the idea, in case you ever use a Sony 70–200 or 100–400 in the future.
How to do it
- Buy a Sony-compatible 1.4x or 2x teleconverter for your supported lens.
- Mount teleconverter to the camera, then the lens to the teleconverter.
What’s good
- Real optical zoom increase (not digital).
- Autofocus still works (a bit slower, but works).
- Great for wildlife, sports, birds.
What’s bad
- You lose light:
- 1.4x teleconverter = 1 stop of light gone.
- 2x teleconverter = 2 stops of light gone.
- A bit of sharpness loss and slower autofocus.
- Not compatible with most budget superzoom lenses like 25–200 or 28–200.
Best practice
- Use a teleconverter only on good sharp lenses and in good light.
- If you’re shooting kids, travel, and daily life, your 25–200mm or 28–200mm plus APS-C + CIZ is usually simpler and cheaper.
5.3 Use clever video settings
If you’re shooting video, the camera gives you more tricks:
- Using APS-C/Super 35 mode in 4K already gives you extra reach.
- Some people shoot in 4K, then crop to 1080p in editing, which is like another zoom for free.
- Clear Image Zoom works brilliantly in video, and you can smoothly “punch in” during a shot.
Best practice
- For video on a full-frame body:
- Try 4K, APS-C mode + Clear Image Zoom up to 1.5–2x.
- Then, if needed, crop a little more in editing when making a 1080p video.
- Keep ISO as low as you can to avoid noisy footage when zoomed.
5.4 The old-school trick: move your feet
It sounds silly, but:
- Walk closer when you can.
- Change your angle.
- Don’t always rely on zoom.
Sometimes stepping five meters closer gives you a better picture than stacking APS-C + CIZ + digital zoom and fighting noise.
Best practice
- Use zoom to fix what your feet can’t fix (like a bird in a tree or a child on a stage).
- Use your feet when it’s safe and possible, especially for portraits and family shots.
Putting it all together (simple recipe)
Let’s say you’re using a Sony full-frame mirrorless with a 25–200mm or 28–200mm lens and you want maximum zoom without buying a huge wildlife lens. Here’s a practical “ladder” you can climb:
- Start at 200mm in full-frame, with good shutter speed.
- Turn on APS-C crop mode when you need a bit more reach.
- Add Clear Image Zoom (up to 2x) in JPEG/Video when you still need more.
- Avoid normal digital zoom unless you have no other choice.
- For stills, remember: Clear Image Zoom does not work on RAW photos. You must be okay with JPEG or crop RAW later.
- In editing, crop a little more if you really have to.
Used carefully, your little 25–200mm or 28–200mm can behave like a much bigger lens. And you don’t have to carry a monster 600mm everywhere.