How to Enable SELinux Safely on Linux Servers/Machines
SELinux usually comes enabled for Linux Systems, like CentOS and Ubuntu. However, sometimes it is disabled by Service Providers. Or whatever the reason is, it should actually be enabled unless you know what you are doing.
SELinux stands for Security-Enhanced Linux. Being a Kernel security module, its job is to provide access control policies that are secure.
How to verify is SELinux is enabled or disabled?
- Open Terminal(Command Line Tool) and log in to your SSH
- Type getenforce and press Enter
- If you see the status as Permissive or Enforcing that means it is enabled. If the status appears as Disabled, you can enable it by following the steps below.
How to Enable SELinux on Linux Systems (CentOS, Ubuntu, Debian, RHEL)
Step – 1: Install Nano if already now installed on your System
- You will need Nano to edit file with Terminal. First Type this to verify whether Nano is installed or not nano –version
- If installed, all good. If not, follow these steps:
How to Install Nano on CentOS and RHEL
Type the following commend and press Enter to install:
sudo yum install nano
Install Nano on Ubuntu or Debian
Type this command to install:
sudo apt install nano
Now Let’s Enabled SELinux
–> Type this or use copy and paste and press Enter
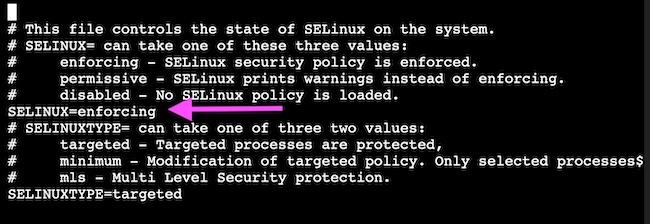
sudo nano /etc/selinux/config
–> Have a look at the screenshot below. you need to write enforcing after SELinux= and should now have # in the beginning of the line.
–> Now press ctrl+x, then you will be prompted to confirm. Press y will confirm.
Note: If pressing y doesn’t exit and you get other options there, just press Enter and it will exit.
–> SELinux is enabled, but don’t reboot yet, else you can’t log in back.
–> Type touch /.autorelabel and press Enter. It will not show any reply. Don’t worry about it. This command is used to apply SELinux label to those files that didn’t have it already labled because SELinux was disabled.
–> Now you are ready to reboot. Type sudo reboot
–> This reboot may take little longer than usual reboot, so hang in there and don’t try to reboot multiple times.