How to Check Ubuntu’s Storage Speed (Read / Write Speed)
There are many ways to find out the Hard Disk, SSD, and NVMe of Storage speed of your Ubuntu Server or Desktop. We will discuss all the ways here.
How to Test the Read / Write Speed of your Linux Machine Without Installing any additional tool or app?
You use the hdparm command-line utility, which is also pre-installed on most Ubuntu systems. But, you should know the device name of the storage device. If you don’t know it, you can run the following command:
lsblkYou will get the result like this. Check the detail and focus on the storage that has the actual storage amount as highlighted in the screenshot below:
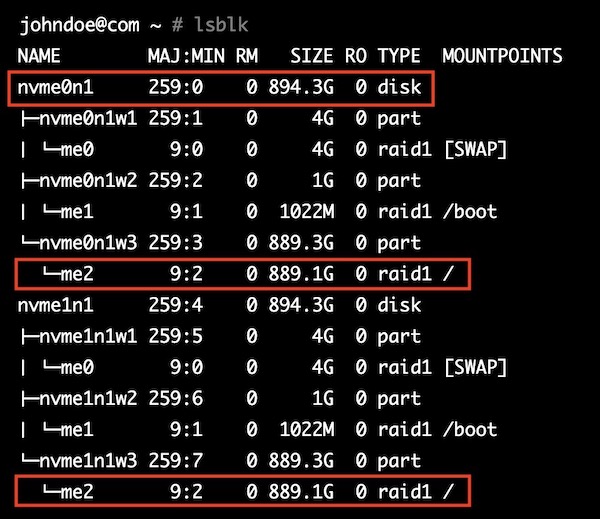
So in the line below where you type the storage mount location you should replace /dev/sda with /dev/me2 or dev/nvme0n1w1. Both of them will work. If it still gives you error try sudo fdisk -l and you should get the location:
root@com ~ # sudo fdisk -l
Disk /dev/nvme0n1: 950.25 GiB, 960197431096 bytes, 1875496008 sectors
Now we know the storage location and name, let’s test the speed
To check the read speed, use the following command:
sudo hdparm -t /dev/sdaReplace /dev/sda with the device name of the storage device that you want to test (scroll up to check how to check if you don’t know). /dev/ part is usually the same for everyone, just need to change /sda/ part with the name of the device storage. This command will perform a buffered read test and display the read speed in megabytes per second.
To check the write speed, use the following command:
sudo hdparm -Tt /dev/sdaThis command will perform a buffered read and write test and display the write speed in megabytes per second, as well as the read speed.
Note that the results of the hdparm tests may not be as accurate as other benchmarking tools, since they rely on the operating system’s buffer cache to perform the tests. Also, the performance of your storage device may be affected by other factors such as the file system type, disk fragmentation, and the hardware interface (e.g., SATA, NVMe).
For more accurate and detailed storage benchmarking, you may want to consider using dedicated benchmarking tools such as Fio, Iozone, or Ddrescue. These tools allow you to perform various types of read-and-write tests with different block sizes, thread counts, and other parameters.
How to test with Iozone for a more accurate result?
Iozone is a file system benchmarking tool that can be used to test the read and write performance of storage devices. Run the following command to install it:
sudo apt-get install iozone3Once installed, you can run the following command to test the write performance:
sudo iozone -w -c -e -i 0 -+n -s 1g -r 1m -t 8This command performs a write test with a 1GB file using a block size of 1MB and 8 threads. The -w option specifies a write test, and the -c and -e options enable file creation and deletion. The -i 0 option disables file caching, and the -+n option sets the file size to the specified value. The -s option specifies the test file size, and the -r option specifies the block size.
To test the read performance, you can use the following command:
sudo iozone -r 1m -s 1g -t 8 -i 1 -i 2 -i 4 -i 8 -i 16 -i 32 -i 64 -i 128 -i 256 -i 512 -i 1024This command performs a read test with a 1GB file using various block sizes and 8 threads. The -r and -s options are the same as in the write test, and the -t option specifies the number of threads. The -i options specify the block sizes to use for the test.