DNS Server Not Responding Error : How to resolve
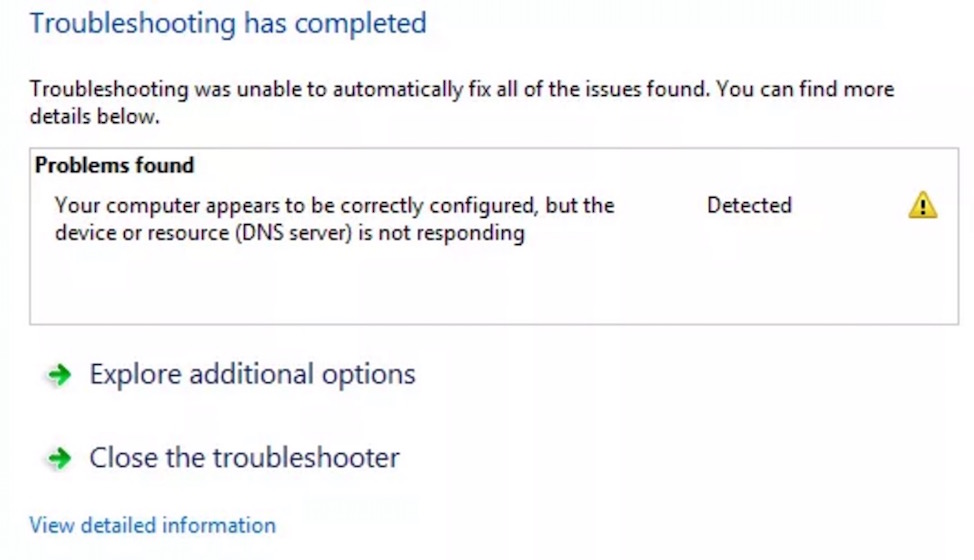
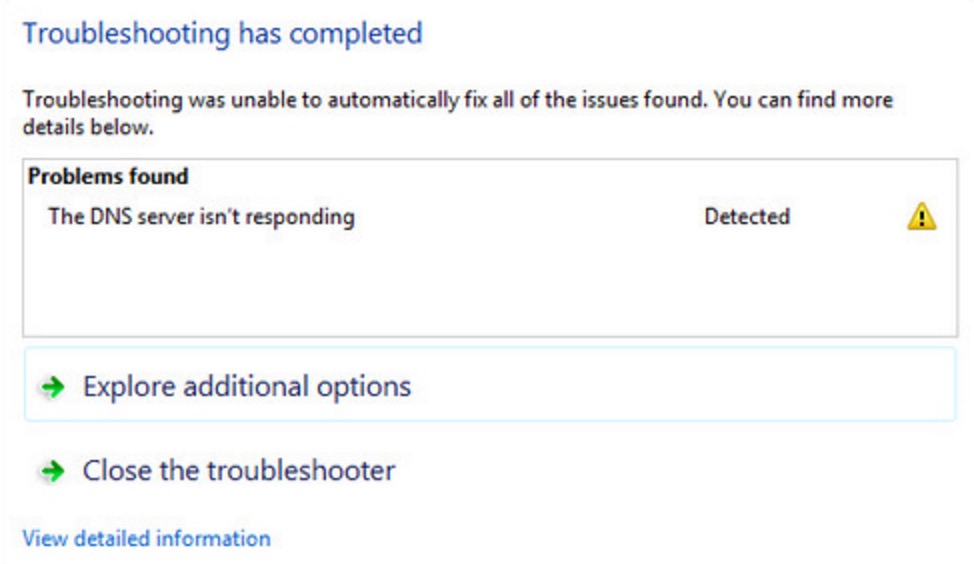
There are times when you are not able to connect to the internet on your computer and get the error. The errors are of various kinds, and one of the most common error is “Your computer appears to be correctly configured, but the device or resource DNS server is not responding.” Whether you are using Windows 7, Windows 8, Windows 8.1 or Windows 10, you may see this error on the screen while troubleshooting the issues.
DNS Server is not responding issue could occur for various reasons, and it could be because of the router/internet issue or the issue with the computer. Whatever the reason is, we will try to fix it.
How to fix DNS Server is not responding issue on Windows 7, Windows 8, Windows 8.1 and Windows 10
Step 1 : Little Troubleshoot
Connect another device to the same network to identify whether the issue is with the internet or the device. Try to connect to via ethernet cable if possible. If you cannot connect to the internet even with an ethernet cable, contact your internet service provider, and ask for the solution.
If you are able to connect to the internet with another device, then the issue is with the device. If the DNS Server not responding error still occurs that means the issue is with the router.
Step 2 : Use a different Internet Browser
We have already discussed the issue with Google Chrome where you may get the errors like dns_probe_finished_no_internet or dns_probe_finished_bad_config, and we also discussed how you can fix it. Read those articles if you are using Google Chrome, and also try to access via another internet browsers, like Firefox, Internet Explorer, Opera etc..
Step 3 : Disable additional network
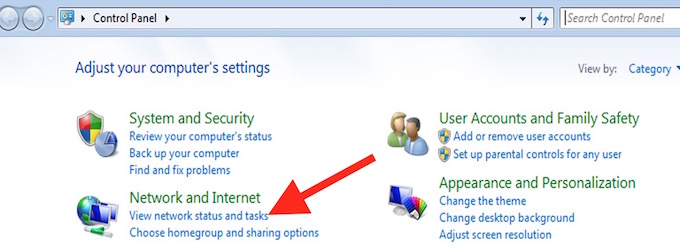
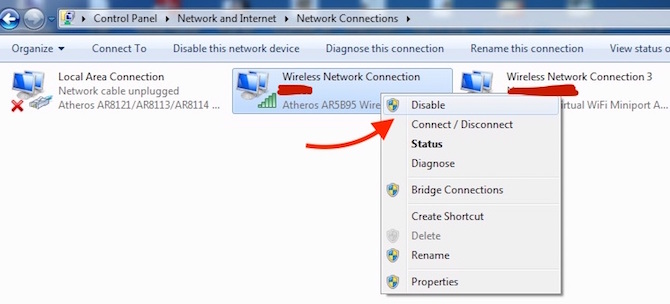
If your computer uses multiple networks, try disabling the one that you are not using, and then turn off WiFi, and connect to the network again. Now try to access the internet. To disable network Adaptor follow these steps;
- Click on the Start button (Windows button), and click Control Panel
- Click View Network Status and Tasks
- Click Change Adapter Settings

- Right-click on the network adapter that you are not using or you don’t use and hit Disable
- Restart the computer, and then try to access the internet
- If the issue is still not resolved, move to step 4
Step 4 : Command Prompt
- Press Windows + R key, and then type cmd in the Open field, and hit enter
- In the command window, type ipconfig /release, hit Enter, then type ipconfig /all, hit Enter, and then type ipconfig /flushdns, Press Enter, and type ipconfig /renew, hit Enter, then type netsh int ip set dns, then hit Enter, and finally type netsh winsock reset, and press the Enter key. Please don’t type comma (,) in the command
- Now restart your computer, and check if the internet is working fine
Step 5 : Change in DNS Configuration
Change the DNS server. To change the DNS Server follow these steps;
- Follow the Step 3 until you reach Network Adapter, right-click on network adapter and select Properties (in step 3 we selected disable, but here we will select Properties to change DNS settings)
- Now select Internet Protocol Version 4 (TCP/IPv4), and select Properties
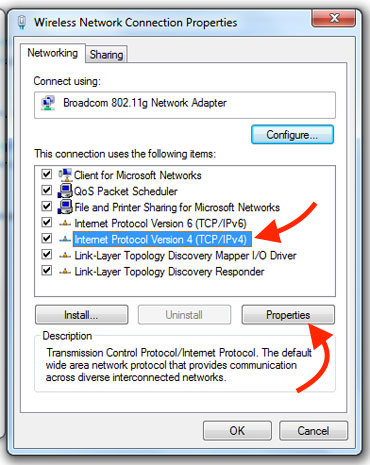
- Select Use the following DNS Server Addresses, and change the DNS server to one of the following
Preferred DNS Server : 8.8.8.8
Alternate DNS Server : 8.8.4.4
OR
Preferred DNS Server : 208.67.222.222
Alternate DNS Server : 208.67.220.220
The first one is Google Public DNS and the other is Open DNS. Both of them should work
- Now click OK to save the setting
If the issue is still not resolved, follow Step 6
Step 6 : Little workaround with router
- Unplug the cable from router and modem
- Turn off the power and wait for a few seconds (at least 20 seconds)
- Now connect the cable again, and turn on the power
- Let the router and modem turn on completely
- Now try to connect to the Internet
Step 7 : Change the DNS Server of your router
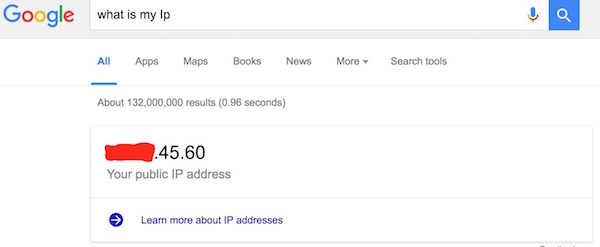
You need to open the router configuration page on your internet browser. Try to find the IP address on the back side of the router or on the box/manual. It should be in this format “192.168.I.I” Type that IP in browser, and hit Enter. If you can’t find IP, connect via Ethernet cable, and type “What is my IP” in Google, and you will get the IP in the search result. Just type that IP in browser, and hit enter, and follow these steps;
- Once you are in the router configuration page, you will have to enter the Admin ID and Password. The default ID and Password can be found on the back side of the router or in manual if you have never changed it
- If you are asked to choose Automatic, Basic and Advanced setup, please select Advanced Setup, and now look for TCP/IP Settings (The location for this setting may vary depending on the router model)
- Under TCP/IP Settings, Select DNS Manually
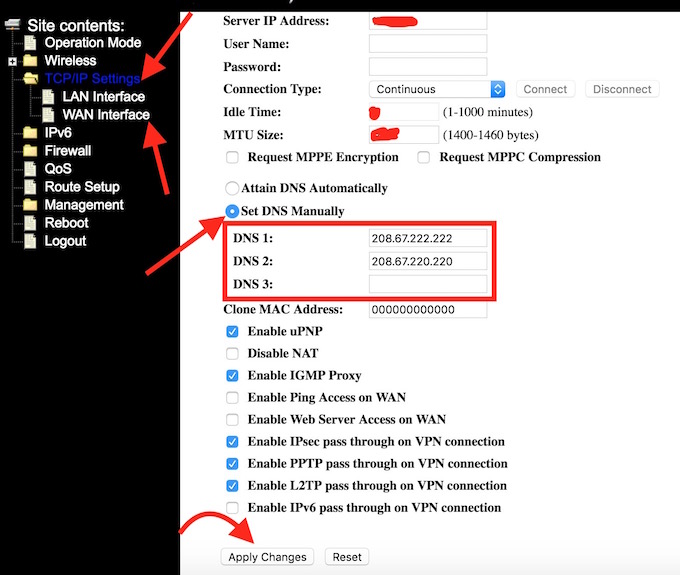
- Now you can use DNS 1 and DNS 2 as 208.67.222.222 and 208.67.220.220 OR 8.8.8.8 and 8.8.8.8 respectively. Please use the same DNS you set on your computer in Step 5
- Click Apply Changes, and now try to access the internet
Proceed to Step 8 if it is still not fixed
Step 8 : Reset Router
Note : Please do this only when you have the ethernet port on your computer as well as cable, or when you know the default password for the router (it should be on the back side of the router or in manual). If you can’t find it, you will require a computer with an ethernet port and cable to connect to the modem directly after you reset. You will also require you router configuration if it doesn’t set the IP and other stuff automatically (router settings can be obtained calling the customer support of your internet service provider)
- Check the router, it would have a tiny hole where you need to insert a thin object to press the button. Insert it, press the button and hold for 10 seconds
- Once the router reboots, connect via ethernet cable to configure the router and try to access the internet